
TL;DR
Ready-to-assemble (RTA) kitchen cabinets arrive flat-packed with pre-drilled panels and pre-finished surfaces. Assembly requires a cordless drill, rubber mallet, carpenter’s square, wood glue, and clamps. The process follows ten steps: unbox and inventory, sort hardware, dry-fit panels, glue and join sides to bottom, square the box, attach the back panel, install the face frame or stretchers, mount hardware, hang doors, and adjust hinges. A first-timer should plan roughly 40 to 60 minutes per cabinet and a full day for an average kitchen.
Ready-to-assemble (RTA) kitchen cabinets arrive flat-packed with pre-cut panels, pre-drilled holes, and the hardware needed to assemble each cabinet box. With the right tools and a little preparation, most homeowners can assemble standard RTA cabinets without professional woodworking experience.
The process involves checking the parts, sorting the hardware, joining the panels, squaring the cabinet box, attaching the back, installing the hardware, and adjusting the doors. As a general planning estimate, allow 30 to 60 minutes per cabinet, depending on its size, drawer configuration, assembly system, and your experience.
Before you begin, check the manufacturer’s instructions to confirm which fasteners to use, whether the joints require adhesive, and how the back panel should be attached. Not all RTA cabinets use the same construction method, and following the supplied instructions is essential to getting a sturdy, correctly aligned result.
This guide explains how to assemble RTA kitchen cabinets in ten steps, including the tools you need, the differences between framed and frameless cabinets, common assembly mistakes, and ways to troubleshoot problems before installation.
If you’re still deciding whether flat-packed cabinets are right for your project, read our RTA cabinet guide for a comparison of their advantages, disadvantages, and costs.
If you’re still deciding between RTA and other options, our RTA cabinet guide covers the pros, cons, and costs in detail.
How Do You Assemble RTA Kitchen Cabinets?
To assemble ready-to-assemble (RTA) kitchen cabinets, unpack and inspect the components, organize the hardware, and connect the cabinet panels according to the manufacturer’s instructions. Square the cabinet box before securing the back panel, install the required braces and hardware, attach the doors and drawer fronts, and adjust the hinges for even gaps. Most standard cabinets take approximately 30 to 60 minutes to assemble, although larger cabinets and drawer-heavy units can take longer.
The 10 Steps at a Glance
Unbox the cabinet and inspect every component.
Sort the hardware and identify the fasteners.
Dry-fit the panels and check their alignment.
Join the sides, bottom, and other required panels.
Check that the cabinet box is square.
Attach the back panel using the specified method.
Install the face frame or structural braces, if required.
Install drawer slides, shelf supports, and hinge hardware.
Attach the doors and drawer fronts.
Adjust the hinges and inspect the finished cabinet.
Important: Follow the instructions supplied with your cabinet. Use wood glue only where the manufacturer permits or requires it, and confirm that the cabinet is square before permanently securing the back panel.
RTA Cabinet Assembly Checklist: What to Do Before You Start
Before assembling your RTA kitchen cabinets, prepare a clean workspace, check the shipment, and identify the hardware. Spending a few minutes on preparation can prevent assembly errors and reduce the risk of damaging finished panels.
Use this checklist before building each cabinet.
Tools and Supplies
Cordless drill or screwdriver with the correct bits
Rubber mallet, if recommended for the cabinet’s joints
Carpenter’s square or another suitable method for checking squareness
Clamps, if needed to hold panels in position
Clean, soft cloth for removing adhesive where permitted
Tape measure
Small containers for organizing hardware
Manufacturer-approved adhesive, if required
Safety glasses and any other recommended protective equipment
Cabinet Parts and Hardware
Confirm that the cabinet model matches the packing list.
Check panels for cracks, chips, scratches, and shipping damage.
Count the fasteners, dowels, brackets, and other included hardware.
Identify the cabinet sides, bottom, back, top braces, and shelves.
Locate the hinge plates, drawer slides, and shelf supports.
Read the manufacturer’s assembly instructions before joining the panels.
Prepare Your Workspace
Choose a clean, dry, well-lit work area with enough room to lay out the panels.
Protect finished surfaces with clean cardboard, a moving blanket, or another nonabrasive covering.
Keep small parts in labeled containers to prevent them from getting mixed up.
Set your drill or screwdriver to an appropriate low-torque setting.
Keep children and pets away from the assembly area.
Check that the completed cabinet can be moved safely to its installation location.
Before proceeding: Do not assemble a cabinet with missing structural hardware, visibly damaged panels, or parts that do not fit correctly. Photograph any damage and contact the supplier before modifying the components.
Key Terms You’ll Encounter During RTA Cabinet Assembly
Understanding a few cabinet-building terms makes the assembly instructions easier to follow. The most important terms describe the fasteners that join the panels, the parts that keep the cabinet box rigid, and the hardware used to attach doors and drawers.
Not every RTA cabinet uses the same joints or hardware. Check your manufacturer’s diagrams to identify the actual components in your kit before beginning assembly.
RTA (Ready-to-Assemble)
Furniture or cabinetry shipped flat-packed with all panels, hardware, and fasteners included. The buyer assembles the product on site. RTA cabinets are not unfinished or raw wood; panels come pre-drilled, edge-banded, and finished.
Cam Lock (Cam Bolt + Cam Disc)
The primary mechanical fastener in most RTA cabinets. A threaded bolt screws into one panel, and a disc embedded in the adjacent panel rotates to lock onto the bolt head, pulling the two panels tight together. Cam nuts must be precisely aligned in their holes with the bolts, or they will not interlock. This is the single most common fastener you’ll handle during assembly.
Dowel Pin
A cylindrical wooden peg that aligns and locates two panels before the cam locks are tightened. Dowels keep panels from shifting during assembly. Glue is optional but recommended for long-term strength.
Dado (Dado Groove)
A flat-bottomed slot cut across the grain of a panel to receive the edge of another panel. The most common example: the bottom panel slides into dado grooves cut in the side panels. This joint adds strength and keeps the bottom from sagging under load. For a deeper look at how these joints affect cabinet quality, see this joinery guide.
Rabbet (Rabbeted Joint)
An L-shaped notch cut along the edge or end of a panel. Back panels often sit in rabbeted grooves along the rear edges of the side, top, and bottom panels. Cabinets with strong rabbeted joints, mechanical fasteners, and dovetail drawers become even more rigid when you add wood glue to these connections.
Face Frame
A solid wood frame (typically 1.5 inches wide) attached to the front of the cabinet box, running around the entire opening. Doors and drawer fronts mount to this frame. The frame adds structural rigidity and makes installation more forgiving because small gaps between cabinets can be hidden behind the frame lip. Shaker-style RTA cabinets almost always use face frames.
Frameless (European-Style)
Cabinets built without a face frame. The doors attach directly to the box sides via cup hinges, creating an unbroken, modern look. Box sides are typically 3/4-inch thick to compensate for the missing frame rigidity. Frameless construction offers about 10 to 15 percent more usable interior space than a comparable framed cabinet. The tradeoff: installation must be dead-level because tight door reveals show every fraction of an inch.
If you’re still weighing framed vs. frameless cabinets, the assembly differences covered later in this guide will help you understand what each style demands.
Stretcher
A horizontal brace running front-to-back (or side-to-side) across the top of a base cabinet. Stretchers are critical in frameless construction because they square the box and distribute countertop weight. Framed cabinets rely on the face frame for this rigidity instead.
Toe Kick
The recessed panel at the base of a floor cabinet, typically 4 inches tall. It lets you stand closer to the countertop without your toes hitting the cabinet. Some RTA lines ship the toe kick as a separate piece that clips on; others integrate it into the side panels.
Cup Hinge (European Hinge)
A hinge that fits into a round, cup-shaped bore on the inside of the door. On frameless cabinets, the mounting plate screws into the inside wall of the box. On framed cabinets, it clips to the face frame. Cup hinges allow three-dimensional adjustment (up/down, in/out, side-to-side), which is why they’re standard on modern RTA lines.
Soft-Close Hinge
A cup hinge with an integrated damper mechanism that decelerates the door in the last few degrees before it shuts, preventing slamming. Standard on most modern RTA cabinet lines. Learn more about soft-close cabinet options.
Drawer Glide (Drawer Slide)
Metal track systems that allow drawers to extend and retract smoothly. Full-extension slides let you pull the drawer all the way out for full access. Undermount slides hide beneath the drawer box for a cleaner look. Budget slides are side-mounted and visible.
Shelf Pin (Shelf Clip)
A small metal or plastic peg that inserts into pre-drilled holes on the cabinet side panels to support adjustable shelves. Most RTA cabinets include multiple rows of holes at consistent intervals so you can customize shelf height.
Overlay (Partial and Full)
How much the door covers the face frame opening. Partial overlay leaves some frame visible between doors. Full overlay covers the frame almost entirely, giving a sleeker appearance. Frameless cabinets are inherently full overlay since there’s no frame.
Pilot Hole
A small-diameter hole pre-drilled into a panel to guide a screw and prevent the wood from splitting. Every screw location on an RTA panel should already have a pilot hole. If one is missing, drill it yourself before driving the screw.
Squaring
The process of verifying that all corners of the assembled box form true 90-degree angles. This is checked with a carpenter’s square before the back panel is attached. If the box is out of square, doors won’t hang properly, drawers will bind, and the cabinet will look crooked after installation.
CARB Phase 2 / EPA TSCA Title VI
Emissions compliance standards for composite wood products (plywood, MDF, particleboard) regulating formaldehyde off-gassing. Because RTA panels are made from composite materials, these certifications matter for indoor air quality and building code compliance, particularly on commercial or multi-family projects that require documentation.
Essential Tools for Assembling RTA Kitchen Cabinets
Most RTA cabinets require no power saws, no routers, and no specialty woodworking tools. The parts are pre-cut and pre-drilled. Here’s what you actually need, in context.
Cordless Drill/Driver
Non-negotiable. You’ll use it to drive screws, pre-drill pilot holes, and install hinges. A cordless drill with at least 18V power and a 1/2-inch chuck handles cabinet assembly easily. Keep it on low torque. High torque strips pre-drilled holes in particleboard and plywood faster than you’d expect.
Phillips #2 Bit
The standard bit for the majority of RTA cabinet screws. Buy a multipack so you have spares when tips wear down.
Rubber Mallet
One of the best tools for nudging parts into position without damaging pre-finished surfaces. A traditional hammer will dent panels and crack edge banding. The rubber mallet lets you press dowels home and nest panels tightly into dado grooves without leaving marks.
Carpenter’s Square
Used to check that each corner of the box is exactly 90 degrees. This is the quality-check tool. Every experienced RTA assembler reaches for it before attaching the back panel.
Bar or Pipe Clamps (Two, 24-Inch)
Hold cabinet panels in position and keep the box square while glue dries and cam locks are tightened. Two 24-inch clamps are sufficient for most cabinet boxes.
Wood Glue (Titebond III)
Titebond III is the standard for joints that bear weight. Apply it to dowels and panel edges where surfaces touch. It dramatically increases the long-term rigidity of the cabinet box.
Damp Cloth
For wiping excess glue squeeze-out before it dries. Dried glue on a pre-finished surface is a headache to remove and will interfere with stain or touch-up if the surface gets nicked later.
Level (4-Foot or 6-Foot)
Needed during installation, not assembly. But keep it handy. A 4- or 6-foot level helps you span gaps between cabinets and verify alignment against walls and countertops.
Stud Finder
Also an installation tool. Locates the studs in your walls so you can anchor wall cabinets securely. You’ll need it the moment assembly ends and hanging begins.
Shims
Thin tapered wedges used to level cabinets on uneven floors or against bowed walls during installation. Cedar or composite shims work equally well.
Before assembly starts, accurate measurements are critical. If you haven’t already measured your kitchen space, this measurement guide walks through the process step by step.
Step-by-Step RTA Cabinet Assembly Sequence
This is the core procedure. It works for both framed and frameless cabinets, with a key difference at Step 7 that’s called out below. The terms in bold refer back to the glossary above.
Before you begin: Use the assembly manual supplied with your cabinet as the primary reference. RTA cabinet systems differ in their fasteners, joint construction, back-panel attachment, and hardware installation. Do not force panels together or substitute screws, adhesives, or other fasteners without confirming that they are compatible with the cabinet design.
Wear appropriate eye protection when using power tools, support panels securely, and keep your hands clear of pinch points. If a part does not fit the specified holes or grooves, stop and check the orientation rather than forcing it into place.
Step 1: Unbox and Inventory
Open every box and check all components against the packing list. Look for damage: dents, gouges, chipped edge banding, or warped panels. Practitioners on RTA review sites consistently report that failing to inspect panels before assembly leads to discovering scratches or warped edges mid-build, when it’s too late to file a shipping claim easily.
Lay panels flat on a clean surface, preferably on moving blankets or cardboard to protect finishes. If your shipment just arrived, our cabinet delivery checklist covers inspection steps and claim procedures.
Time: 5 to 10 minutes per cabinet.
Step 2: Sort Hardware
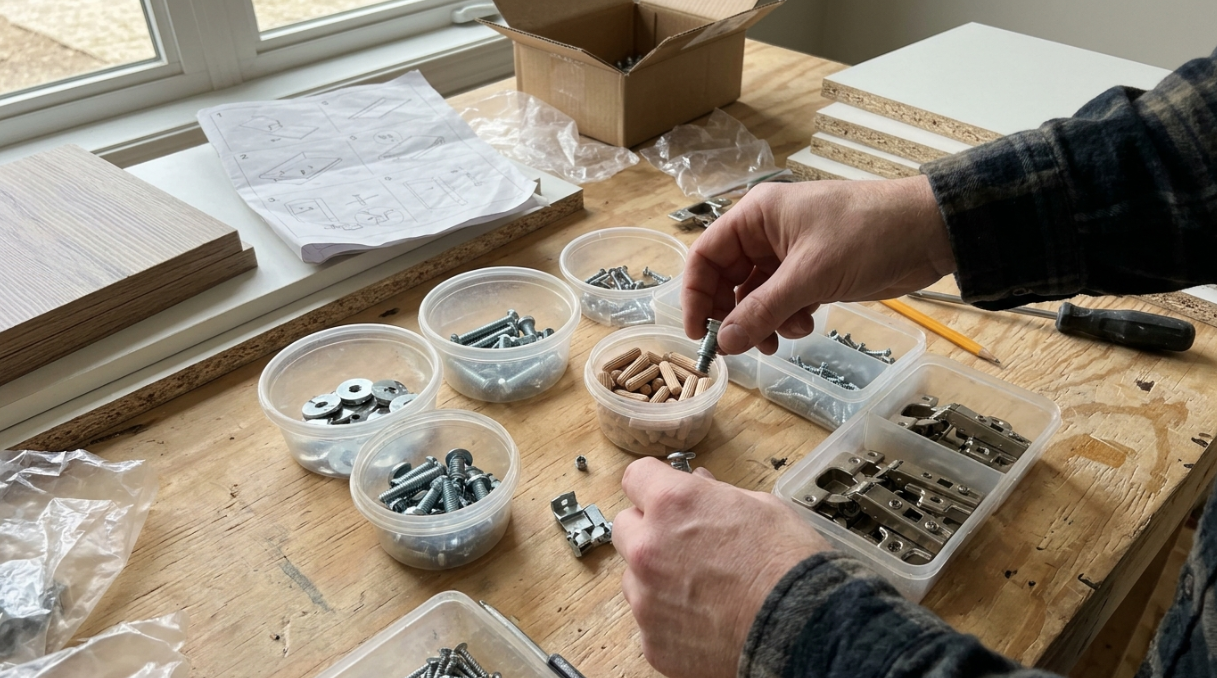
Separate cam bolts, cam discs, dowel pins, screws, shelf pins, and hinge hardware into labeled containers (small plastic cups or a muffin tin works well). A cluttered workspace forces you to search for parts mid-project, breaks momentum, and increases the chance of losing small hardware.
Time: 5 minutes per cabinet.
Step 3: Identify and Align the Panels
Before permanently fastening anything, identify the cabinet’s side panels, bottom, back, top braces, and any other included components. Compare their shapes and pre-drilled holes with the manufacturer’s diagrams.
If the instructions call for a dry fit, position the panels together without adhesive to confirm their orientation and alignment. Check that the holes, grooves, dowels, and fastener locations match the intended connections.
Do not force a panel into a groove or tighten a fastener that does not engage correctly. If the parts do not align, check whether a panel is reversed or whether you have selected the wrong component.
Time: Allow approximately 5–10 minutes for a standard cabinet, adjusting for the number of components and the complexity of the assembly system.
Step 4: Join the Cabinet Panels
Follow the manufacturer’s assembly sequence to connect the side panels, bottom panel, and any required top braces or other components. Depending on the cabinet design, the joints may use cam locks, dowels, screws, brackets, interlocking grooves, or a combination of fasteners.
Align the pre-drilled holes and joints before tightening the fasteners. If the instructions specify cam locks, position each cam correctly over its corresponding bolt and rotate it in the direction indicated by the manufacturer.
Tighten fasteners until the joint is secure, but do not overtighten them. Excessive force can damage the panel material, strip screw holes, or break the fastener.
Use adhesive only when the manufacturer specifies or permits it. If adhesive is required, follow the product instructions for application and cleanup.
Time: Allow approximately 10–15 minutes for a standard cabinet, depending on the joint design and number of connections.
Step 5: Check That the Cabinet Box Is Square
Before permanently securing the back panel, confirm that the cabinet box is square. A box that is twisted or out of square can make door alignment and installation more difficult.
Use a carpenter’s square to check accessible corners. If the cabinet geometry allows it, measure the two diagonals across the same rectangular opening. When the measurements are equal, the box is generally square, provided the panels are straight and the corners are properly aligned.
If the measurements differ, check the panel positions and fasteners. Adjust the box according to the manufacturer’s instructions before proceeding.
Do not force the cabinet into shape if the panels, joints, or fasteners do not align. Investigate the cause first.
Time: Allow approximately 3–5 minutes for a straightforward cabinet, with additional time if adjustments are necessary.
Step 6: Attach the Back Panel
Install the back panel using the method specified in the cabinet instructions. Depending on the design, it may slide into grooves, fit against the rear edges of the cabinet box, or attach with designated screws, clips, staples, or other fasteners.
Before securing the panel, confirm that the cabinet remains square and that the back panel is oriented correctly. Follow the specified fastening sequence so the panel sits flush and the joints engage as intended.
Once the back panel is secured, recheck the cabinet’s alignment. Do not add unapproved fasteners or modify the panel to compensate for a box that is out of square.
Time: Allow approximately 5–10 minutes for a standard cabinet, depending on the attachment method.
Step 7: Install Face Frame (Framed) or Stretchers (Frameless)
This is where the two construction types diverge.
Framed cabinets: Attach the face frame to the front of the box. Some RTA lines pre-attach the face frame; others require you to glue and pin or screw it in place. The frame adds the front structural loop that keeps the box rigid.
Frameless cabinets: Install the stretchers across the top of the box. These horizontal braces square the front opening and support countertop weight. Without a face frame doing this job, the stretchers are structurally essential.
Time: 5 to 10 minutes per cabinet.
Step 8: Install the Required Hardware
Install the drawer slides, hinge plates, shelf supports, and other hardware at the stages specified in the manufacturer’s instructions.
For drawer cabinets, check the orientation of each slide and confirm that the left and right components are installed on the correct sides. For adjustable shelves, insert the shelf pins into the designated holes at matching heights.
Install hinge plates using the specified mounting locations and fasteners. Some systems use pre-drilled holes, while others require a particular mounting procedure.
Move each drawer slide through its range of travel, where possible, and verify that the hardware is secure before attaching the doors or drawer fronts.
Time: Allow approximately 10–15 minutes for a standard cabinet. Drawer-heavy units may require additional time.
Step 9: Hang Doors and Drawer Fronts
Clip doors onto the hinge mounting plates. For drawer fronts, attach them to the drawer box using the provided screws. This is where you’ll see whether your squaring work in Step 5 paid off.
Time: 5 to 10 minutes per cabinet.
Step 10: Adjust Hinges
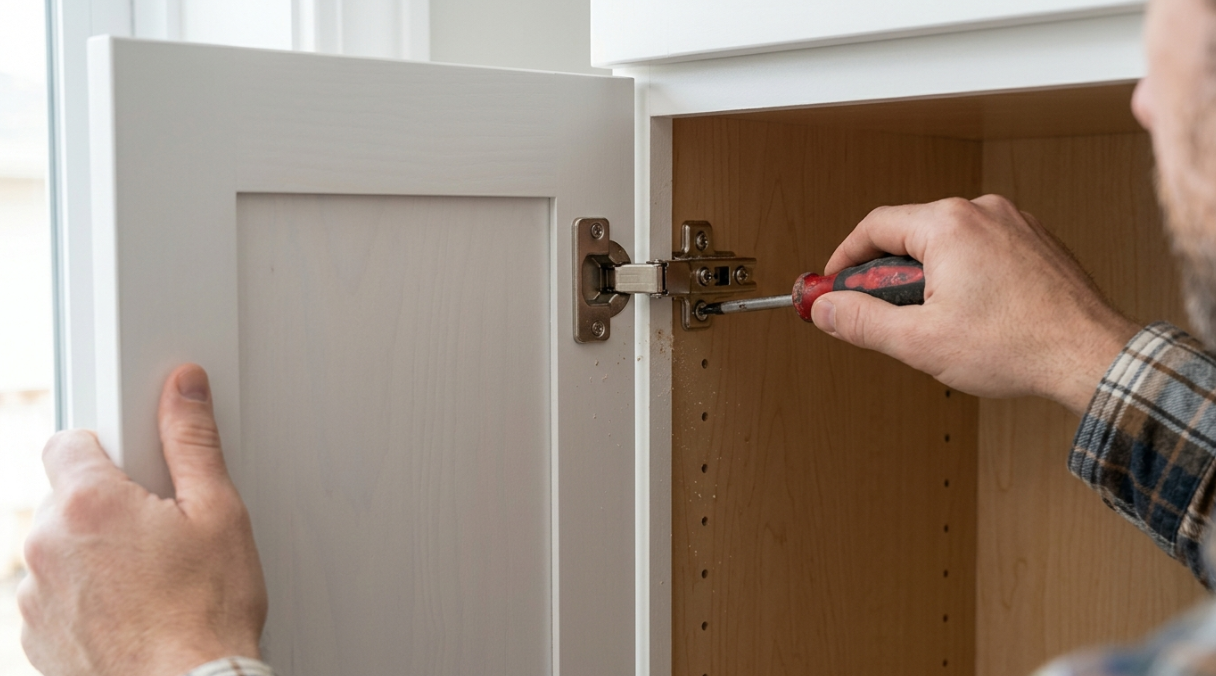
Cup hinges offer three-axis adjustment: up/down, in/out, and side-to-side. Turn the adjustment screws until doors are perfectly aligned with consistent gaps (called “reveals”) on all sides. On soft-close hinges, also verify the damper engages smoothly by opening and releasing the door.
This step is where first-timers spend the most unexpected time. Don’t rush it. Proper door alignment is the difference between professional-looking results and a kitchen that looks like a weekend hack job.
Time: 5 to 10 minutes per cabinet.
Framed vs. Frameless RTA Cabinets: Key Assembly Differences
Framed and frameless RTA cabinets follow many of the same basic assembly principles, but their front construction and hardware mounting methods can differ. Identifying the cabinet type before starting helps you understand which components to look for and where the doors and braces attach.
Feature | Framed RTA Cabinets | Frameless RTA Cabinets |
|---|---|---|
Front construction | A face frame is attached to the front of the cabinet box. | The cabinet box has no face frame. |
Door mounting | Hinges attach to the face frame or designated mounting hardware. | Hinges typically attach to the cabinet side panels or designated mounting plates. |
Structural components | The face frame, back, joints, and other specified components contribute to rigidity. | The box joints, back, stretchers, and other specified components contribute to rigidity. |
Door appearance | The frame may remain visible, depending on the overlay style. | Doors commonly cover most of the cabinet front, creating a more continuous appearance. |
Assembly considerations | Follow the instructions for attaching or aligning the face frame if it is supplied separately. | Pay particular attention to box alignment, hardware placement, and the specified bracing. |
Final door adjustment | Adjust hinges to achieve consistent gaps and alignment. | Adjust hinges to achieve consistent gaps and alignment. |
Does the Cabinet Type Change the Assembly Process?
The basic principles remain the same: identify the parts, connect the panels correctly, verify the box is square, attach the required structural components, and install the hardware.
The exact procedure depends on the cabinet manufacturer. Some products arrive with the face frame already attached, while others require additional assembly. Frameless cabinets may use different braces and hinge-mounting arrangements.
Always follow the instructions for your specific cabinet model rather than assuming that all cabinets of the same construction type use identical hardware.
Framed vs. Frameless: How Assembly Differs
Most assembly guides treat all RTA cabinets as identical. They’re not. Framed and frameless cabinets assemble differently, and confusing the two causes real problems.
Feature | Framed (Shaker, Traditional) | Frameless (European-Style) |
|---|---|---|
Front structure | Face frame (1.5″ solid wood) glued/nailed to box front | Stretchers brace across the top; no face frame |
Typical side panel thickness | 1/2″ to 5/8″ | 3/4″ (thicker to compensate for missing frame) |
Door mounting | Hinges attach to face frame | Cup hinges screw into box side panels |
Installation tolerance | More forgiving (frame lip hides small gaps) | Demands dead-level install (tight reveals expose errors) |
Interior space | Slightly less (frame lips protrude inward) | About 10-15% more usable interior space |
Tools needed | Drill/driver, #2 Phillips bit, rubber mallet, wood glue, damp rag | Same, plus extra attention to level during install |
Assembly complexity | Slightly simpler (frame adds rigidity early) | Slightly more demanding (squareness is everything) |
For a deeper comparison of these construction types, including cost and style considerations, see the frameless vs. face frame guide.
How Long Does It Take to Assemble RTA Kitchen Cabinets?
The time required to assemble RTA kitchen cabinets depends on the cabinet’s size, the number of components, the fastening system, and your experience. A standard cabinet with straightforward joints generally takes less time than a drawer-heavy base cabinet, corner unit, or tall pantry cabinet.
Use the following estimates for initial project planning rather than as guaranteed assembly times.
Cabinet Type | Suggested Planning Allowance | Factors That Can Increase Assembly Time |
|---|---|---|
Standard wall cabinet | 30–45 minutes | Complex joints, additional braces, or difficult panel alignment |
Standard base cabinet | 40–60 minutes | Larger panels, additional hardware, or alignment adjustments |
Drawer base cabinet | 45–75 minutes | Multiple slides, drawer components, and drawer-front alignment |
Corner cabinet | 45–90 minutes | Unusual geometry, additional panels, and more complicated joints |
Tall pantry cabinet | 60–90 minutes or longer | Larger panels, multiple compartments, and additional hardware |
These are practical starting estimates for planning, not verified industry averages. Check the manufacturer’s guidance and allow extra time when assembling a cabinet system for the first time.
How Long Does It Take to Assemble an Entire Kitchen?
For a kitchen containing 12–20 cabinet boxes, allow a full day or more for assembly, depending on the number and type of cabinets and the assembler’s experience.
For a more accurate estimate:
Count the cabinet boxes in the order.
Group them by type, such as wall, base, drawer, corner, and pantry cabinets.
Estimate assembly time for each group.
Add time for unpacking, inspecting parts, organizing hardware, and correcting problems.
Schedule installation separately from assembly.
Assembly and installation are different tasks. The total project schedule must also account for leveling, fastening the cabinets in place, joining adjacent units, and coordinating countertops and other trades.
Wondering how that compares to buying pre-assembled cabinets? The time-versus-cost math is covered in this RTA vs. assembled comparison.
Common Assembly Mistakes and How to Avoid Them
These are the errors that actually happen in practice, not theoretical warnings.
1. Overtightening screws. Pre-drilled holes in particleboard and plywood strip easily under excessive torque. Tighten until snug, then stop. If a screw spins freely, the hole is stripped. Fix it with a toothpick and wood glue packed into the hole, let it dry, then re-drive the screw.
2. Skipping the square check. The one step that requires genuine care is checking the box is square before the back panel is fixed. Get that wrong and doors will never align properly. Practitioners on woodworking forums call this the “point of no return,” and they’re right.
3. Ignoring brand-specific instructions. RTA cabinet hardware varies slightly by manufacturer. Cam lock sizes differ. Hinge mounting positions differ. Don’t skip the instruction sheet even if you’ve assembled flat-pack furniture a hundred times before.
4. Losing small hardware. Sort everything at the start (Step 2). A cluttered workspace causes mid-project searches, breaks your rhythm, and delays the whole project.
5. Skipping wood glue. While most RTA cabinets hold together with screws and cam locks alone, a little wood glue on dowel joints and panel edges where surfaces touch ensures longer-lasting cabinets. It takes 30 seconds per joint and makes a meaningful difference in rigidity over years of use.
6. Forgetting to wipe glue squeeze-out. Dried glue on pre-finished surfaces is visible, ugly, and hard to sand off without damaging the finish. Keep a damp cloth within arm’s reach at all times.
7. Not inspecting panels before assembly. Open every box and check for damage before you start building. Discovering a cracked panel at Step 6 means disassembling everything and waiting for a replacement. Trustpilot reviews of RTA vendors consistently flag this as a preventable frustration.
For a broader list of renovation pitfalls, this kitchen remodel mistakes guide covers planning errors that affect the entire project.
Common RTA Cabinet Assembly Mistakes and How to Avoid Them
Even straightforward RTA cabinet assembly can go wrong when panels are misaligned, fasteners are overtightened, or manufacturer instructions are overlooked. Avoid these common mistakes to reduce the risk of damaging your cabinets.
1. Tightening Fasteners Too Much
Excessive torque can strip screw holes, damage composite panels, or break fasteners. Use an appropriate drill setting and tighten connections according to the manufacturer’s instructions.
2. Skipping the Squareness Check
An out-of-square cabinet box can make door alignment and drawer operation more difficult. Check the box before permanently securing the back panel, using a carpenter’s square or diagonal measurements where appropriate.
3. Ignoring the Assembly Manual
Different cabinet systems use different joints, fasteners, and hardware configurations. Even if you have assembled flat-pack furniture before, check the instructions for the specific cabinet model.
4. Mixing Up Panels and Hardware
Left and right panels may look similar but have different hole patterns or edge details. Identify each component before joining the panels, and keep hardware separated in labeled containers.
5. Using Unapproved Glue or Fasteners
Not every cabinet requires additional adhesive, and not every screw is suitable for every panel. Use only the fasteners and adhesives specified or approved by the manufacturer.
6. Installing the Back Panel Before Checking Alignment
The back panel may help maintain the cabinet’s shape, depending on the construction method. Check that the box is properly aligned before securing it, and follow the specified fastening sequence.
7. Assembling Damaged or Incomplete Components
Inspect the parts before assembly. If a structural panel is cracked or essential hardware is missing, document the problem and contact the supplier rather than improvising a repair.
Best practice: Work through one cabinet at a time, verify each connection, and resolve any alignment problems before moving to the next stage.
RTA Cabinet Assembly Troubleshooting: Common Problems and Fixes
If an RTA cabinet does not fit together as expected, stop and identify the cause before tightening more fasteners or modifying a panel. Many assembly problems come from incorrect panel orientation, mismatched hardware, or components that have not been aligned properly.
Problem | Possible Cause | What to Do |
|---|---|---|
Cam lock will not engage | The bolt is misaligned, the cam is incorrectly oriented, or the wrong fastener was selected. | Check the manufacturer’s diagram and confirm that the bolt and cam match. Do not force the lock. |
Panels will not fit together | A panel may be reversed, a joint may be misaligned, or the wrong component may have been selected. | Compare the panel with the assembly diagram and check the hole and groove positions. |
Screw spins without tightening | The screw hole may be stripped or the fastener may be incorrect. | Stop tightening. Consult the manufacturer about the approved repair or replacement procedure. |
Cabinet box is out of square | The panels may be misaligned, the joints may not be fully seated, or the back panel may have been attached incorrectly. | Check the panel positions and diagonal measurements before proceeding. |
Back panel will not fit | The panel may be reversed, the box may be out of square, or the attachment method may have been misunderstood. | Recheck the instructions and panel orientation. Do not trim the panel unless the manufacturer permits it. |
Cabinet door sits unevenly | The cabinet box may be out of square, a hinge may be incorrectly mounted, or the hinges may need adjustment. | Check the box and mounting hardware first, then make the hinge adjustments specified by the manufacturer. |
Drawer binds or does not close smoothly | Slides may be reversed, misaligned, or installed in the wrong positions. | Check slide orientation, mounting locations, and the drawer’s fit against the cabinet box. |
Panel arrives cracked or damaged | The component may have been damaged during shipping or handling. | Photograph the damage, retain the packaging if practical, and contact the supplier before assembly. |
Hardware is missing | The package may be incomplete or a component may have been overlooked during sorting. | Check the packing list and contact the supplier for the missing parts. |
Door gaps remain uneven after adjustment | The cabinet may be out of square, the hinge plates may be incorrectly positioned, or the doors may not be mounted properly. | Verify the box alignment and hinge installation before making further adjustments. |
When Should You Stop Assembly?
Stop and contact the cabinet supplier if a structural panel is cracked, required hardware is missing, fasteners cannot engage correctly, or the components do not match the assembly instructions.
Avoid drilling new holes, trimming panels, substituting fasteners, or applying additional adhesive until you have confirmed that the modification is appropriate for your cabinet system.
Should You Assemble RTA Cabinets Yourself or Hire a Professional?
Assembling RTA kitchen cabinets yourself can reduce labor expenses, but it requires time, careful handling, and attention to detail. Hiring a professional may be worthwhile if you have a large project, complicated cabinet configurations, or a schedule that leaves little room for mistakes.
Factor | DIY Assembly | Professional Assembly |
|---|---|---|
Labor cost | You provide the labor, but still need tools and supplies. | You pay for the agreed assembly service. |
Time commitment | You must allow time for learning, assembly, and troubleshooting. | An experienced assembler may complete the work more efficiently. |
Quality control | You are responsible for following the instructions and checking each cabinet. | Quality depends on the provider’s experience and procedures. |
Scheduling | You can work at your own pace, subject to the project deadline. | Availability depends on the provider’s schedule. |
Complex cabinet systems | May require additional research and patience. | A qualified professional may be better equipped to handle complicated configurations. |
When DIY Assembly Makes Sense
Consider assembling the cabinets yourself if you are comfortable using basic tools, can follow detailed instructions, have adequate workspace, and can allow extra time for unexpected problems.
When Professional Assembly Makes Sense
Consider hiring an experienced assembler if you have numerous cabinets, complex configurations, limited time, or concerns about handling large panels safely.
Remember that cabinet assembly and cabinet installation are different jobs. Even if you assemble the cabinets yourself, you may want a professional to level, secure, and align them in the kitchen.
When to Hire a Professional vs. Assemble Yourself
The decision comes down to time math.
If you’re a homeowner remodeling one kitchen, the learning curve costs you roughly a full day of assembly time for 12 to 20 cabinets. If your time is worth less to you than a contractor’s hourly rate (typically $40 to $75 per hour for cabinet assembly in most markets), DIY makes sense. You’ll also learn a skill that’s useful for future projects.
If you’re a contractor or remodeler running multiple jobs, the calculus shifts. Assembly time is labor cost. For a 20-box kitchen, 8 to 14 hours of assembly at crew wages adds up. Some suppliers offer assembly services that deliver cabinets ready to install, cutting your on-site labor to hanging and adjusting only.
Consider hiring a professional if:
You’re working on more than 20 cabinet boxes
You have no experience with cam lock construction
Your project timeline is tight and assembly delays will push back other trades
The cabinets are frameless (installation tolerances are less forgiving)
If you’re a trade professional evaluating suppliers who offer assembly support alongside cabinet sourcing, contractor cabinet pricing and lead times breaks down what to look for.
Frequently Asked Questions
How long does it take to assemble one RTA cabinet?
A first-timer should plan 40 to 60 minutes for the first few cabinets. With practice, that drops to 25 to 35 minutes per base cabinet. Experienced assemblers can finish in 12 to 20 minutes including drawer boxes and squareness checks.
What’s the difference between cam locks and dowels?
Cam locks are the mechanical fasteners that pull two panels tight together. Dowels are wooden alignment pins that position the panels correctly before the cam locks are tightened. They work together: dowels locate, cam locks secure.
Do I need wood glue for RTA cabinets?
Strictly speaking, most RTA cabinets will hold together without it. But applying wood glue to dowels and panel contact points significantly improves long-term strength and reduces the chance of joints loosening over years of use. It takes seconds per joint and is strongly recommended.
Can one person assemble RTA cabinets alone?
Yes, for wall and standard base cabinets. A single person can handle the assembly of most boxes. Tall pantry cabinets and large corner units are easier with two people because the panels are heavy and awkward to hold in position while tightening cam locks. Installation (especially wall cabinets) almost always benefits from a helper.
What’s the difference between assembly and installation?
Assembly means building the cabinet box from flat-packed panels. Installation means mounting the assembled boxes to walls and floors, leveling them, connecting them to each other, and integrating them with countertops, plumbing, and electrical. They are separate phases and should be planned on separate days for a full kitchen.
Do framed and frameless RTA cabinets assemble the same way?
Not exactly. The first six steps are nearly identical. The key difference is Step 7: framed cabinets get a face frame attached to the front of the box, while frameless cabinets use stretchers for bracing. Door mounting also differs. Framed cabinets use hinges that attach to the face frame, while frameless cabinets use cup hinges that screw directly into the box side panels.
What if a panel is damaged or a part is missing?
Contact the supplier before you start assembling that cabinet. Most RTA vendors have replacement part policies, but claims are much easier to process when you report damage before assembly, not after. Photograph the damage and reference the packing list item number.
How many cabinets are in a typical kitchen?
A standard 10×10 kitchen layout usually includes 12 to 20 individual cabinet boxes (a mix of wall, base, drawer, and possibly corner or pantry units). At 8 to 14 total hours of assembly time, that’s a full day of work.
Assembling RTA kitchen cabinets is genuinely within the skill range of any patient person with a drill and a carpenter’s square. The vocabulary is the steepest part of the learning curve, and now you have it. Print this page, sort your hardware, and start with the easiest wall cabinet to build confidence before tackling the corner units.
For trade professionals looking for a cabinet supplier with fast lead times, in-stock inventory, and both framed and frameless lines, find a cabinet supplier built for contractors.