
TL;DR
The edge profile you choose for your countertop affects cost, durability, cleaning, safety, and overall kitchen style. Eased edges account for roughly 50 to 60% of residential kitchens because they’re cheap and chip-resistant. Ornate profiles like ogee and mitered edges can aFull Bullnosedd 25 to 100% to fabrication costs. This guide covers every common profile, maps each one to its installation requirements, and flags the real-world mistakes that homeowners and contractors run into.
Your fabricator asks you to “pick an edge.” You stare at a sheet of profile names you’ve never heard before. This moment, which feels minor, actually determines how your countertops will look, how much they’ll cost, how easy they’ll be to clean, and whether they’ll chip the first time someone bumps a cast iron pan into them.
This reference covers common countertop edge profiles and installation considerations from both angles: what each profile looks like and what it means for your project. Whether you’re a homeowner mid-remodel or a contractor helping a client decide, this guide treats both the aesthetic choice and the structural reality.
If you’re still in the early planning stages, our kitchen remodel checklist can help you sequence decisions like edge selection at the right time.
What Are the Most Common Countertop Edge Profiles?
Countertop edge profiles are the finished shapes along the exposed edges of kitchen and bathroom countertops. Common options include eased, beveled, pencil, bullnose, ogee, mitered, and laminated edges. Eased edges are a versatile, low-maintenance choice for most kitchens, while bullnose edges provide rounded corners and ogee edges create a more decorative look. Mitered edges create the appearance of a thicker slab, and waterfall edges extend the countertop material down the side of an island. The best profile depends on your countertop material, budget, preferred style, edge durability, and fabrication requirements.
Every Common Countertop Edge Profile, Explained
The profiles below are listed roughly from simplest to most complex. For each one, you’ll find a description, cost tier, durability notes, cleaning characteristics, style pairing, and a specific installation note.
Eased Edge (Flat Polish / Straight Edge)
A flat, squared-off edge where the sharp 90-degree corners are softened just enough to prevent chipping. The “easing” is subtle, a tiny round or chamfer on the top and bottom that you can feel but barely see.
Cost: Usually included in your base slab price with no upcharge. Installed cost runs roughly $10 to $18 per linear foot.
Chip resistance: Excellent. The stone stays at full thickness, so there’s more material to absorb impact.
Cleaning: The simplest profile to wipe down. No curves or grooves where crumbs collect.
Style pairing: Modern, transitional, Shaker kitchens. If your kitchen has clean lines, this is the default for a reason.
Installation note: Eased edges are finished completely before installation. No special transport precautions, no drama. This is why it accounts for an estimated 50 to 60% of residential kitchen countertops.
Beveled Edge
The bevel features a diagonal cut along the top of the countertop, typically at a 45-degree angle. It gives a sharper, more defined look than eased without adding any real complexity.
Cost: About 5 to 10% above an eased edge.
Chip resistance: Very good. The angled surface actually distributes impact differently than a square corner, which helps hide minor chips.
Cleaning: Almost as easy as eased. The bevel creates a small angled surface that’s simple to wipe.
Style pairing: Works well with both modern and transitional kitchens. A subtle upgrade for anyone who wants something slightly more intentional than a flat edge.
Installation note: Same as eased. The edge is complete before installation, and transport is straightforward.
Pencil Edge
Straight along the sides, but with more pronounced rounding on the top and bottom corners than an eased edge. The name comes from the way it resembles the rounded tip of a pencil.
Cost: Comparable to eased, sometimes a few dollars more per linear foot.
Chip resistance: Very good. The rounded corners have no sharp points to catch and chip.
Cleaning: Easy. The gentle curves don’t trap debris.
Style pairing: Shaker and Slim Shaker kitchens. It pairs particularly well with white Shaker vs. Slim Shaker cabinets because both share that balance of simplicity and softness.
Installation note: For families with small children who bump into countertop-height surfaces, pencil is marginally more forgiving than eased or beveled.
Half Bullnose
Rounded on top, flat on the bottom. The top curves gently into the vertical face, creating a smooth, comfortable edge to lean against.
Cost: About 10 to 15% above eased.
Chip resistance: Good. The rounded top absorbs bumps better than square corners.
Cleaning: Slightly more effort than eased due to the curve, but nothing problematic.
Style pairing: Traditional to transitional. Half bullnose works well with raised-panel cabinets and more classic kitchen designs.
Installation note: Fabricators handle bullnose edges more carefully during transport. The rounded profile is slightly more vulnerable to chipping during the move from shop to kitchen. Once installed, durability is excellent.
Full Bullnose
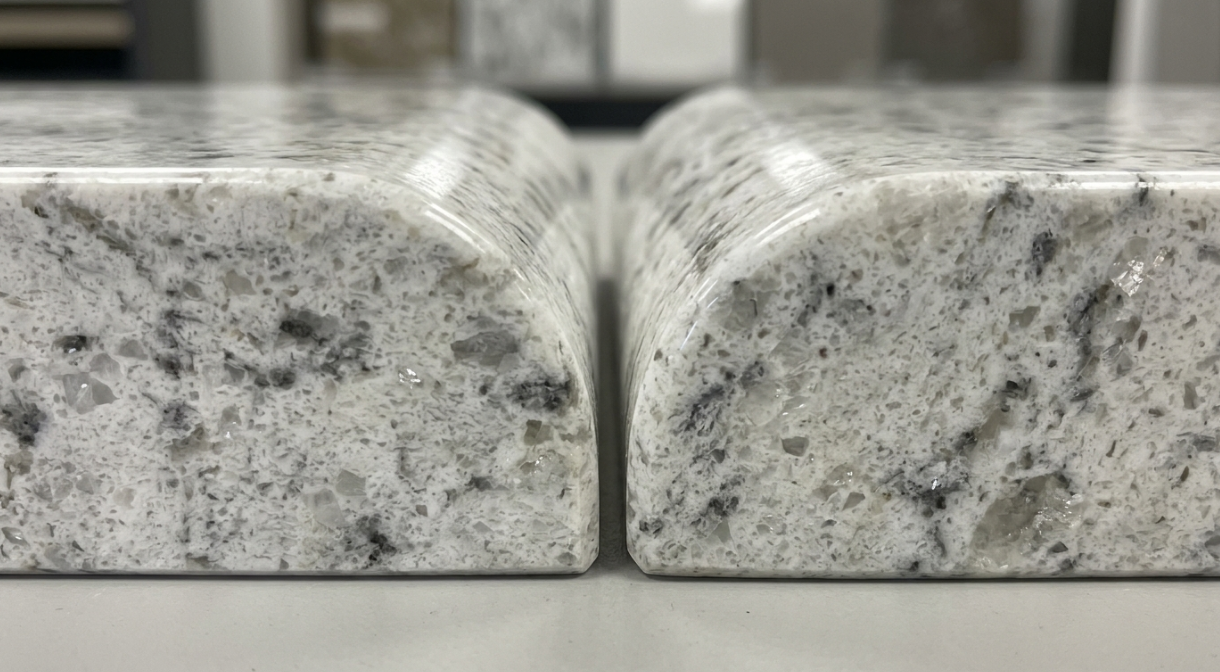
Both the top and bottom edges are rounded to form a complete semicircle. No sharp points anywhere.
Cost: Roughly $8 to $15 per linear foot above base pricing, or about 10 to 15% more than eased.
Chip resistance: Excellent for everyday use. The fully rounded shape distributes force across a curve rather than concentrating it at corners.
Cleaning: The continuous curve requires a bit more attention to wipe thoroughly compared to flat edges.
Style pairing: Traditional kitchens, but be aware of a design shift. Interior designers have noted that rounded or bullnose edges can feel dated, particularly because they remind people of laminate countertops from the 1990s and 2000s. Designer Sarah Scales has specifically called out this association.
Installation note: Same transport care as half bullnose. The full curve makes the edge more delicate in transit than during daily use.
Ogee Edge
The ogee cuts a decorative S-curve into the top corner, combining a concave dip with a convex roll before meeting the vertical face. It’s one of the most ornate standard profiles.
Cost: 25 to 40% above eased, or roughly $25 to $45 per linear foot. The price reflects reality: ogee profiles require multiple passes with different router bits and expert hand-finishing.
Chip resistance: Poor to fair. The intricate curves create thin spots that are vulnerable to chipping, and chip repair on an ogee is significantly harder than on a flat profile. An eased edge chip is a clean break that a fabricator can usually fill and polish. An ogee chip removes material from a curved surface that requires reshaping, which is more labor-intensive and sometimes impossible to match perfectly.
Cleaning: Below average. The S-curve creates a groove that traps grease, crumbs, and soil. In commercial settings, ogee edges are considered poor choices for this reason.
Style pairing: Traditional kitchens with raised-panel cabinet doors. Interior designer Mary Gordon notes that highly ornate edges like ogee add visual weight, so they pair best with kitchens that already have substantial architectural detail.
Installation note: Ogee edges make seams more visible. If your countertop layout requires joints (and most do), the complex curves make it much harder to align the profile seamlessly across two slabs. Practitioners on Houzz forums have reported frustration with ogee seam visibility, particularly near outside corners.
One more thing worth noting: on Houzz, a homeowner shared that “everyone including the fabricator said Ogee is out and I’ll regret getting it.” If you love the look, that’s your call to make. But understand the maintenance and cost implications before committing.
Dupont (Step Edge)
A bold, architectural profile that creates a stepped ledge along the top of the countertop. It gives the appearance of a thicker slab without requiring one.
Cost: 20 to 35% above eased.
Chip resistance: Fair. The step creates a ledge that can catch and chip, though less dramatically than ogee.
Cleaning: The step itself is a small horizontal surface that collects debris. Not as bad as ogee, but noticeably harder to clean than eased or bevel.
Style pairing: Modern to contemporary kitchens. Works particularly well with 3/4-inch or 1-1/4-inch slabs where you want visual thickness.
Installation note: Requires precise fabrication. The step must be consistent along the entire run, which means careful CNC programming and quality control at the shop.
Mitered Edge
Two stone slabs are joined at a 45-degree angle to create the appearance of a thick, solid block of stone. The result is striking, giving a 6-centimeter or thicker look from standard 3-centimeter material.
Cost: 60 to 100% above eased. This is precision work.
Chip resistance: The joint itself is the vulnerability. The glue line at the miter is a potential failure point if the fabrication isn’t perfect.
Cleaning: Easy on the visible surfaces, but crumbs can settle into the miter joint line over time.
Style pairing: Modern, minimalist, slab-door kitchens. Mitered edges pair naturally with frameless cabinet construction and clean, contemporary design.
Installation note: This is critical: mitered corners are always done in the shop, never on-site. The miter must be cut at exactly 45 degrees. A quarter-degree variance shows. This profile demands the most skilled fabrication of any standard edge, and it should absolutely be handled in controlled workshop conditions.
Waterfall Edge
A waterfall edge runs the countertop material down the side of the island or cabinet to the floor, creating a continuous slab effect.
Cost: Among the highest, comparable to or exceeding mitered pricing, because a waterfall is essentially a miter taken to the extreme.
Chip resistance: Good on surfaces, but the mitered corner where the top meets the side is vulnerable.
Cleaning: The vertical surface collects less grime than horizontal surfaces, but the corner joint needs attention.
Style pairing: High-end modern kitchens. Waterfalls make the stone the centerpiece.
Installation note: Waterfall edges require the cabinet structure below to be absolutely solid. The mitered corner must be supported perfectly, and grain or vein matching between the horizontal and vertical slabs requires careful planning at the slab yard. Practitioners report that inadequate cabinet structure is a common cause of waterfall edge failures.
Laminated (Built-Up) Edge
Edge lamination bonds an extra strip of material to the underside of the slab, doubling the apparent thickness.
Cost: 40 to 80% above eased. The labor of cutting, bonding, and finishing the added strip is significant.
Chip resistance: Good, since the overall mass is greater.
Cleaning: A visible seam line runs along the joint between the original slab and the laminated strip. This seam can collect residue over time.
Style pairing: Works across styles when you want a thick, substantial look without paying for a solid extra-thick slab.
Installation note: The laminated joint must cure fully before installation. If the bonding isn’t clean, the seam line becomes a permanent visual flaw.
Chiseled / Raw Edge
An unpolished, rough-hewn edge that preserves the natural look of the stone slab. The stone is fractured along the edge rather than machined.
Cost: Varies. The fabrication is different rather than simpler, so pricing is shop-dependent.
Style pairing: Rustic kitchens, industrial settings, and natural-stone-forward designs where the organic contrast against polished surfaces is the point.
Installation note: These edges are irregular by design, which means they don’t align neatly against walls. Plan for a slightly larger gap between the countertop edge and any backsplash.
Cove Edge
A concave (inward-curving) profile along the top of the edge. It’s the inverse of a bullnose.
Cost: Moderate, typically in the half-bullnose range.
Style pairing: Less common in residential kitchens. More often seen in commercial or healthcare settings where the inward curve directs spills back onto the countertop surface.
Installation note: Standard fabrication and installation, similar in complexity to half bullnose.
Edge Profile Comparison Table
This quick-reference table helps you scan common countertop edge profiles and installation considerations side by side.
Profile | Cost vs. Eased | Chip Resistance | Cleaning Ease | Best Kitchen Style | Install Complexity |
|---|---|---|---|---|---|
Eased | Baseline | Excellent | Excellent | Modern, Shaker | Low |
Beveled | +5–10% | Very good | Very good | Modern, transitional | Low |
Pencil | +0–5% | Very good | Very good | Shaker, transitional | Low |
Half Bullnose | +10–15% | Good | Good | Traditional, transitional | Low |
Full Bullnose | +10–15% | Excellent | Good | Traditional | Low |
Ogee | +25–40% | Poor–Fair | Below average | Traditional, ornate | Medium |
Dupont | +20–35% | Fair | Fair | Modern, contemporary | Medium |
Mitered | +60–100% | Fair (at joint) | Good | Modern, minimalist | High |
Waterfall | +60–100% | Fair (at joint) | Good | High-end modern | High |
Laminated | +40–80% | Good | Fair (seam line) | Versatile | Medium |
Chiseled | Varies | Fair | Fair | Rustic, industrial | Medium |
Countertop Edge Profiles Compared: Cost, Durability, and Style
The best countertop edge profile balances appearance, maintenance, fabrication cost, and the properties of the countertop material. Use this table to compare the most common options before requesting a fabrication quote.
Edge Profile | Relative Cost | Edge Shape | Maintenance | Common Design Styles |
|---|---|---|---|---|
Eased | Low | Nearly square with softened corners | Very easy | Modern, Shaker, transitional |
Beveled | Low | Angled top edge | Very easy | Modern, transitional |
Pencil | Low | Gently rounded corners | Very easy | Contemporary, Shaker |
Half bullnose | Low to moderate | Rounded top, flatter bottom | Easy | Traditional, transitional |
Full bullnose | Low to moderate | Fully rounded edge | Easy | Traditional, classic |
Ogee | High | Decorative S-curve | Moderate | Traditional, ornate |
Dupont | Moderate to high | Decorative stepped profile | Moderate | Traditional, formal |
Mitered | High | Angled joint that creates a thicker appearance | Easy on finished surfaces | Modern, minimalist |
Waterfall | High overall project cost | Countertop material continues down the side | Easy on finished surfaces | Contemporary, modern |
Laminated or built-up | Moderate to high | Additional material creates a thicker appearance | Easy to moderate | Transitional, modern, traditional |
Chiseled or raw | Varies | Irregular, textured edge | Depends on texture and stone | Rustic, industrial |
Cove | Moderate | Inward-curving edge | Moderate | Traditional, specialty applications |
Important: These are relative cost categories, not universal prices. Actual fabrication charges depend on the material, slab thickness, profile dimensions, local labor rates, number of exposed edges, and fabricator. A waterfall edge also requires additional slab material and installation labor, so its total cost should not be compared directly with a simple edge-profile surcharge.
For most homeowners, eased, beveled, and pencil edges offer the best balance of simplicity, versatility, and maintenance. Decorative and built-up profiles make more sense when the countertop edge is an important part of the overall design.
How to Choose the Right Countertop Edge Profile
Choosing a countertop edge profile becomes easier when you start with your priorities instead of the shape alone. Consider your budget, countertop material, kitchen style, maintenance preferences, and how the edge will be used.
Choose Eased, Beveled, or Pencil for Everyday Practicality
These profiles work well for homeowners who want a clean appearance without elaborate detailing. They are generally straightforward to fabricate, easy to clean, and compatible with many kitchen designs. An eased edge is a practical starting point when you want to keep fabrication costs predictable.
Choose Bullnose for a Softer, Rounded Appearance
Half bullnose and full bullnose edges soften the countertop’s outline and suit traditional or transitional kitchens. Their rounded shapes can also feel more comfortable where people frequently rest their arms. However, the actual impact resistance still depends on the stone, thickness, and fabrication quality.
Choose Ogee for Decorative Detail
An ogee edge adds a pronounced, traditional profile that can complement raised-panel cabinets and formal kitchen designs. Consider its higher fabrication cost and more involved cleaning before selecting it for a busy kitchen.
Choose Mitered or Waterfall Edges for a Bold, Modern Look
A mitered edge creates the appearance of a thick countertop, while a waterfall design continues the countertop material down the side of an island or cabinet. Both require careful material planning, accurate measurements, and experienced fabrication. Waterfall installations also require suitable cabinet support and additional material.
Choose Laminated Edges When You Want More Visual Thickness
A laminated or built-up edge bonds additional material to the slab to create a thicker-looking countertop. Ask the fabricator how the joint will be finished and whether the seam will be visible from normal viewing angles.
Match the Profile to the Countertop Material
Not every material can support every profile equally well. Thin porcelain slabs, brittle natural stone, laminate, and solid-surface materials have different fabrication requirements. Confirm that your chosen material can accommodate the profile before finalizing the design.
Questions to Ask Before Making Your Final Choice
Is the profile included in the quoted price, or is there an additional fabrication charge?
Can this profile be fabricated safely in my chosen countertop material and thickness?
How will the profile look where two countertop sections meet?
Does the quoted price cover every exposed edge, including the island?
Will the finished profile affect overhang support or cabinet clearances?
Can I inspect a physical sample or completed project before approving the work?
The best countertop edge is the one that suits your design, performs well in everyday use, and fits the project’s total budget.
Material and Edge Profile Compatibility
The material you choose constrains your edge options more than most people expect. Here’s how common countertop edge profiles and installation considerations play out across materials.
Quartz
The most versatile material for edge profiles. Engineered quartz is consistent, durable, and handles even intricate profiles like ogee and Dupont without the chipping risks you’d face with natural stone. If you’re weighing quartz against natural stone, our quartz vs. granite comparison breaks down the trade-offs in detail.
Granite
Handles most profiles well, but the material varies dramatically by color and origin. Brittle granites (some whites, blacks with large crystal structures) are better suited to eased or lightly rounded edges. Very hard granite holds a crisp profile beautifully but polishes more slowly, which can affect pricing.
Marble and Quartzite
Both are softer or more brittle than quartz and many granites. Fabricators often steer marble and quartzite clients toward eased or bevel edges because complex profiles create thin spots that chip easily. If you’ve fallen in love with a Calacatta marble and an ogee edge, understand that you’re accepting higher maintenance and repair risk.
Porcelain Slabs
Thin by nature, typically 6mm to 12mm. Porcelain slabs almost always need a built-up (laminated) edge to achieve any meaningful profile. Eased is the standard; anything more elaborate requires bonding additional material.
Laminate
Laminate countertops have their own edge vocabulary: self-edge (where the laminate wraps around), post-form (a curved factory edge), or applied edge strips in wood or metal. Most stone profiles don’t apply here.
Solid Surface (Corian and Similar)
The most forgiving material for edge work. Solid surface can be routed, sanded, and even re-profiled on-site without the risks associated with stone. If a chip happens, it’s repairable to near-invisible condition.
Prefab Quartz: The Edge Limitation Most People Miss
This is a critical consideration that many glossary-style guides skip entirely. Prefab quartz slabs, the format most common in budget and mid-range kitchen projects, almost always ship with an eased edge. Some manufacturers offer a beveled or pencil edge as an alternative. That’s it.
If your design calls for an ogee, a waterfall, or a mitered edge, prefab isn’t your product. You’ll need custom-cut slab quartz. Our guide on prefab quartz vs. slab quartz explains the cost, size, and seam trade-offs between the two formats, including how edge selection factors into the decision.
How to Confirm That a Countertop Material Supports Your Chosen Edge
Before selecting a decorative countertop edge, ask the fabricator to confirm that the profile is suitable for the specific slab being used. Two slabs made from the same general material can behave differently during cutting, polishing, transport, and installation.
Consider these factors:
Slab thickness: Thin materials may need a built-up edge or a manufacturer-approved edge detail.
Material characteristics: Natural stone can vary in grain structure, veining, fissures, and strength. Engineered materials also have product-specific fabrication requirements.
Profile geometry: Deep curves and narrow transitions may leave less material in vulnerable areas.
Cutouts and seams: Openings, corners, and joints require additional fabrication planning.
Manufacturer guidance: Porcelain, engineered quartz, and solid-surface products may have specific restrictions on edge fabrication and installation.
Request confirmation from the fabricator before committing to an elaborate profile. A sample or photograph of a completed installation using the same material can help you assess the finish and appearance.
Installation Considerations by Profile Type
Most articles about countertop edges treat installation as an afterthought. But the edge you pick directly affects fabrication complexity, transport risk, seam quality, and on-site requirements. Here’s what actually matters for each category.
Simple Profiles: Eased, Beveled, Pencil
These edges are finished completely in the shop before the countertop arrives at your home. Installation is straightforward. The slab goes on the cabinets, gets leveled, and gets secured. No special handling, no field adjustments.
Rounded Profiles: Half Bullnose, Full Bullnose
Standard installation, but fabricators and installers handle these more carefully during transport. The rounded portions are slightly more fragile than flat edges because a direct impact hits curved stone at a point rather than distributing across a flat surface. Once installed, durability is excellent.
Ornate Profiles: Ogee, Dupont
Ogee edges create the most visible seam challenge in countertop installation. The complex S-curve must align perfectly where two slabs meet, and even skilled fabricators struggle to make ogee seams invisible. If your layout puts a seam near a highly visible area (like the front edge of an island), discuss this with your fabricator before committing to an ogee profile.
Dupont edges are less problematic at seams than ogee, but the step must be perfectly consistent along the entire run.
Mitered and Waterfall Edges
Mitered cuts happen in the shop under controlled conditions, never on-site. The precision required, exactly 45 degrees with zero tolerance for error, demands workshop equipment and controlled environments.
Waterfall installations add another layer of complexity: the cabinet or island base must be built plumb and square to support the vertical slab. Grain matching between the horizontal top and vertical side requires the fabricator to identify matching areas on the same slab (or a companion slab) at the stone yard. This planning needs to happen before any cutting begins.
On-Site Re-Profiling: When and Why to Avoid It
Can you change a countertop edge after installation? Technically, yes. Practically, it’s risky and expensive. Vibration from grinding near sinks can crack grout or wreck caulk joints. Stone dust from dry cutting is a serious silica hazard, and OSHA’s silica standard (29 CFR 1926.1153) requires engineering controls for any silica-generating operation. Any on-site stone grinding must be done wet or with a HEPA vacuum attachment.
The takeaway: get the edge right the first time.
Countertop Overhang Support: What Edge Profiles Can and Cannot Do
Countertop overhangs affect appearance, seating comfort, and structural requirements. The amount of support needed depends on the countertop material, slab thickness, overhang depth, cutouts, cabinet construction, and the support system specified by the fabricator or manufacturer.
Standard Cabinet Overhangs
A modest overhang typically extends beyond the cabinet face to provide clearance for doors and drawers. The required dimensions depend on the cabinet design and countertop specifications. Confirm the finished overhang during templating so the countertop clears the cabinet fronts correctly.
Seating and Island Overhangs
Deeper overhangs create space for stools but increase the unsupported span of the countertop. Depending on the material and installation design, the fabricator may require steel brackets, corbels, a support frame, or another engineered solution.
Do not select support spacing based on a general rule alone. Obtain written guidance for the actual slab, thickness, overhang depth, and loading conditions.
How Slab Thickness Affects Edge Selection
A 2 cm slab and a 3 cm slab may require different fabrication and support arrangements. Some profiles remove more material than others, while built-up edges change the appearance without necessarily increasing the structural capacity of the entire countertop.
Ask the fabricator whether the chosen profile is suitable for the slab and whether reinforcement is required around long spans, corners, or cutouts.
Cutouts and Unsupported Areas
Sink and cooktop openings interrupt the slab and can create vulnerable areas, particularly when they are close to an edge or overhang. The installation plan should account for cutout placement, material characteristics, reinforcement, and the manufacturer’s requirements.
Installation takeaway: Confirm overhang dimensions and support requirements with the fabricator before approving the final template. A decorative edge should never substitute for appropriate structural support.
How Countertop Edge Profiles Affect Your Total Cost
The cost of a countertop edge depends on more than the profile name. Fabricators may include a basic eased edge in the countertop price and charge an additional fee for decorative profiles, built-up edges, or specialized fabrication.
Before comparing quotes, determine whether each price covers the entire countertop installation or only the upgrade from the standard edge.
What Determines Countertop Edge Fabrication Costs?
Profile complexity: Simple eased and beveled edges generally require less fabrication time than intricate ogee or built-up profiles.
Countertop material: Quartz, granite, marble, quartzite, porcelain, laminate, and solid surface have different cutting, polishing, and bonding requirements.
Slab thickness: Thin slabs may need additional material or a built-up edge to achieve a thicker appearance.
Exposed linear footage: Longer finished edges increase the amount of fabrication required.
Corners and seams: Outside corners, joints, and complex transitions may require additional planning and finishing.
Installation requirements: Waterfall panels, mitered joints, specialized supports, and difficult site access can increase the total project cost.
Why Kitchen Islands Can Cost More
An island may have a long front edge, exposed ends, and additional finished surfaces. A perimeter countertop positioned against walls may have much less exposed edge requiring decorative finishing.
For example, an island measuring 8 feet by 4 feet has a perimeter of 24 linear feet. If all four sides were exposed and finished, the full perimeter would be relevant to the estimate. If only the front and two ends were exposed, the finished length would be 16 linear feet.
The actual charge depends on the fabricator’s pricing method and the portions of the countertop that require the selected profile.
How to Compare Fabricator Quotes
Ask each fabricator to identify:
The standard edge included in the base countertop price.
The additional cost per linear foot for the selected profile.
The total exposed linear footage being charged.
Any extra costs for laminated edges, mitered corners, or waterfall panels.
Whether fabrication, delivery, installation, and required supports are included.
Request an itemized quote using the same countertop material, thickness, measurements, and edge profile. This makes it easier to compare bids accurately.
Cost takeaway: Choose the edge after confirming the slab material and dimensions, then compare the total installed price rather than relying on a profile’s advertised surcharge alone.
Common Mistakes and How to Avoid Them
These problems come up repeatedly in forums and contractor discussions. Practitioners on Houzz have documented every one of these scenarios with real project photos.
Not Specifying the Edge in Writing
A homeowner on Houzz ordered a deep 3/4-inch double bevel, specified it on the spec sheet with a reference photo, and got confirmation from the fabricator. They received a 1/4-inch bevel edge. Another homeowner reported receiving two different edge profiles on adjoining slabs that were supposed to match.
The fix: Put the exact profile name, the depth or radius, and a reference photo in your fabrication contract. Get written confirmation that the fabricator can execute it before work begins. This belongs on your kitchen remodel mistakes to avoid checklist.
Choosing an Ornate Edge on Brittle Material
Soft marbles and certain quartzites chip at delicate profiles. The fabricator may execute the profile perfectly in the shop, but the first time a heavy pot slides across that thin ogee curve, you’ll have a chip that’s nearly impossible to repair invisibly.
Profiling Before Final Templating
Some shops profile all four edges of an island slab before templating is complete. If the measurement comes back slightly off, the profile has to be reworked or a seam has to be added. Digital templating before any profiling work begins prevents this entirely.
Overlooking Prefab Edge Limitations
If you’ve ordered prefab quartz and expect an ogee or waterfall edge, you’ll be disappointed. Prefab ships with eased or (sometimes) beveled edges. Knowing this upfront saves time and conflict.
Ignoring Overhang Support
Brackets every 24 to 36 inches for overhangs beyond 10 to 12 inches on 3-centimeter stone. Skip this and you risk cracking, especially with heavier edge profiles that add visual weight people tend to lean on.
Accepting “Industry Standard” as an Answer
One homeowner on Houzz specified an eased edge. The top edges looked fine, but the underside had sloppy, wavy areas near outside corners. The fabricator claimed it was within “industry standard.” A quality fabricator delivers mirror-gloss finishes on all visible surfaces. If you see circular machining marks or dull spots under direct light, that’s a quality control shortcut, not a standard.
Matching Edge Profiles to Cabinet Door Styles
Edge profiles and cabinet doors should speak the same design language. Here’s a framework that works:
Shaker and Slim Shaker doors: Eased, pencil, or bevel. These doors have clean lines with a simple frame-and-panel construction. Ornate edges compete with the simplicity. For more on Slim Shaker options, see our Slim Shaker cabinets guide.
Slab doors and frameless modern cabinets: Eased, mitered, or waterfall. The absence of cabinet door frames calls for countertop edges that are equally clean. A mitered edge on a frameless kitchen creates a continuous block-of-stone effect. Our framed vs. frameless cabinets guide explains how construction style influences design choices like these.
Raised panel and traditional doors: Ogee, half bullnose, or full bullnose. These cabinet doors already have architectural detail, so a more ornate edge profile complements rather than competes.
The 2025-2026 trend: Simple edges continue to dominate. Designers consistently point out that fancy decorative countertop edges, which trended in the 1990s and 2000s, feel heavy in contemporary kitchens. If you’re aiming for a current look, eased and mitered edges are where the market is heading. When simple edges do the job, they let your countertop color and veining be the star. Our guide on matching quartz countertops with cabinets goes deeper on how material selection and edge choice work together.
Fabrication Quality: What to Look For
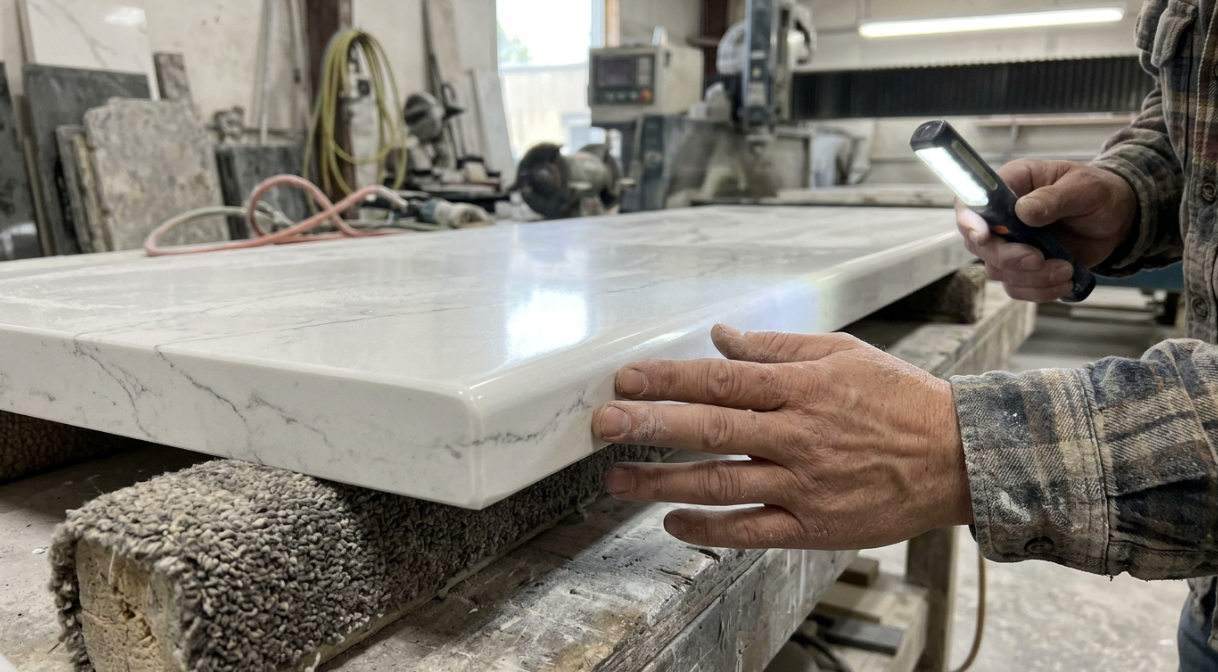
Not all fabrication is equal, and edge quality is where the differences become obvious.
Polishing sequence matters. A mirror-gloss edge finish requires a careful multi-step polishing sequence. Shops under production pressure sometimes cut corners, delivering edges that look dull or show visible circular machining marks under direct light. You’ll notice these immediately when the countertop is installed and sunlight hits the edge.
Digital templating prevents rework. Laser or digital templating before any cutting begins ensures the slab dimensions are locked in. This is especially important for mitered and waterfall edges where rework can mean scrapping expensive material.
Inspect before installation. Run your hand along every edge before the installers apply adhesive. Check for consistent radius, smooth transitions, and even polish. It’s far easier to address problems at this stage than after the countertop is set.
For contractors coordinating cabinet and countertop installation on tight timelines, working with a cabinet supplier for contractors who understands sequencing can prevent the kinds of scheduling conflicts that lead to rushed fabrication.
Countertop Edge Profile Installation Checklist
Use this checklist before approving your countertop fabrication drawings and scheduling installation. Confirming the details in advance can help prevent mismatched edges, visible seams, unexpected costs, and support problems.
Before Fabrication
Confirm the countertop material, slab thickness, and exact edge profile.
Approve a profile drawing or physical sample showing the intended shape and dimensions.
Verify which sides will receive the finished profile, including island ends and exposed backs.
Complete cabinet installation and confirm that the cabinets are level, square, and properly supported.
Approve the final countertop template, including sink and cooktop cutouts.
Identify seam locations and discuss how the edge profile will align across joints.
Confirm the full fabrication price, including any specialty edge charges.
For waterfall countertops, approve the vertical panel dimensions, corner details, and vein-matching plan.
Before Installation
Inspect the finished edges for chips, cracks, uneven polishing, and inconsistent profile dimensions.
Check that visible seams and joints match the approved fabrication drawings.
Confirm that the countertop fits the cabinets and that the planned overhangs are correct.
Verify that required brackets, corbels, or other support systems are installed.
Check sink and cooktop cutouts and confirm that the relevant fixtures fit the approved openings.
Confirm that the installer has a plan to protect finished edges during transport and placement.
After Installation
Inspect the exposed edges and corners under normal room lighting.
Check seams, adhesive joints, and visible transitions.
Confirm that the countertop is level and properly supported.
Review the fabricator’s care and maintenance instructions for the selected material.
Document any chips, cracks, or finish defects and agree on corrective action before signing off on the work.
What to Put in the Fabrication Agreement
The written specification should identify the edge profile, dimensions or radius where applicable, countertop thickness, exposed sides, approved drawings, seam locations, and agreed price. Include reference photos if the profile has a distinctive shape.
Written approval reduces the risk of disputes over what the homeowner expected versus what the fabricator delivered.
Frequently Asked Questions About Countertop Edge Profiles
What is the best countertop edge profile for most kitchens?
An eased edge is a versatile choice for many kitchens because it has a clean appearance, is easy to maintain, and is generally straightforward to fabricate. Pencil and beveled edges are also practical alternatives. The best option depends on the countertop material, kitchen design, budget, and intended use.
Which countertop edge profile is easiest to clean?
Eased, beveled, and pencil edges are generally among the easiest to clean because they have few grooves or decorative recesses. Ornate profiles such as ogee may require more attention because their contours can collect residue.
Which countertop edge is most resistant to chipping?
There is no universally most chip-resistant profile across all countertop materials. Eased edges retain a relatively simple geometry, while rounded edges avoid sharp corners. Material characteristics, slab thickness, fabrication quality, and impact location all affect chipping risk.
Are mitered countertop edges worth the extra cost?
A mitered edge can be worthwhile when you want a thick, architectural appearance without using a solid slab of the same visible thickness. It typically requires precise fabrication and careful joint finishing. Compare the complete fabrication and installation quote with the cost of other ways to achieve the desired appearance.
Is a waterfall countertop edge the same as a mitered edge?
No. A mitered edge is a fabrication technique in which pieces are joined at an angle, often to create the appearance of a thicker slab. A waterfall countertop is a design in which the countertop material continues down a vertical side. Waterfall corners are often mitered, but the two terms describe different things.
Can you change a countertop edge after installation?
Sometimes. The feasibility depends on the countertop material, existing profile, available clearance, and the new shape being considered. Reprofiling can create dust, noise, and a risk of damage to the slab or nearby finishes. Consult a qualified fabricator before attempting changes, especially on installed stone.
What countertop edges are available for prefab quartz?
Options vary by manufacturer and supplier. Some prefabricated quartz products offer a limited selection of factory-finished edges, while more elaborate designs may require custom fabrication. Confirm the available profiles and modification restrictions before ordering.
How much does it cost to upgrade a countertop edge?
Costs depend on the profile, material, thickness, local labor rates, and the length of exposed edges. Some basic profiles are included in the countertop price, while decorative or built-up profiles may carry additional fabrication charges. Ask for an itemized quote that distinguishes the edge surcharge from the total installed cost.
Do countertop edge profiles affect overhang support?
The profile alone does not determine the support required. Material, slab thickness, overhang depth, cutouts, and the support arrangement all matter. Have the fabricator specify the appropriate support system for the actual countertop design.
What should I specify when ordering a countertop edge?
Include the exact profile name, dimensions or radius where applicable, countertop material and thickness, exposed sides, seam locations, and a reference drawing or photograph. Obtain written confirmation that the fabricator can produce the specified profile and that the agreed price covers all required edges.